Well, my wife and I had a beautiful baby two years ago with big eyes and lovely smiles all the time. He’s the little sunshine in our family, bringing us so much happiness. But when he comes to the age of two, you’ll find out that sometimes he really causes troubles. Like this time, I was so careless that I forgot to turn off my laptop for work. My little devil just reached his “crawls” to my laptop when I was busy with something else. Now you may have already known what happened. Yes! He deleted more than 1 GB of my important files, and emptied the Recycle Bin. Shall I feel lucky for having such a talented kid who is able to empty the Recycle Bin in the age of two? Well, now, since I’m not so good at computing, I turned to Google, hoping that I can get some free advice instead of hiring a data recovery service which would cost me a lot.
First I learnt that if there’s no new data being saved to the partition where the files got deleted from, the files/data actually are still there (where they were). It’s just the computer has labeled them as “deleted”, and for this reason you cannot see them. Microsoft told me that I can recover the files from a backup, but I haven’t yet created a backup for these files (I just wanna punch myself at this point of time).
So I was then told that there’s some data recovery software out there, which are not that expensive but also reliable. After doing some research for the best data recovery software on PC World, Softpedia and download.com, I finally decided to try EaseUS Data Recovery Wizard Free. This freeware can recover up to 2 GB files, which I think should be enough for me. Their official site suggested not to install the recover software on the partition where the files got deleted. After installing EaseUS Data Recovery Wizard, I just follow the guide of “how to recover deleted files from recycle bin” on EaseUS site, and performed the data recovery step by step.
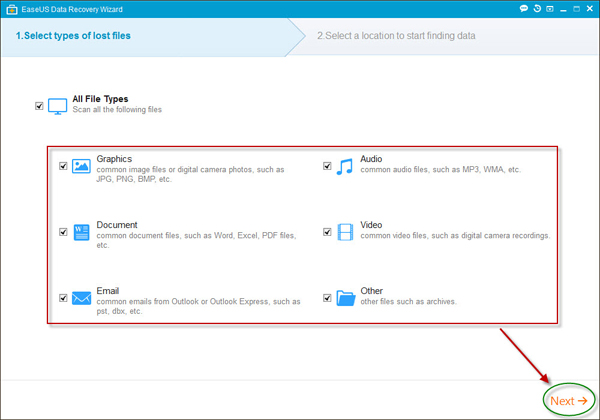
First step is to select file types that need to be recovered, which I think is pretty simple. Just like this. To my understanding, this step will help the software to skip other types of files, and only focus on the ones I need to recover. Thus, the recovering process will take less time.
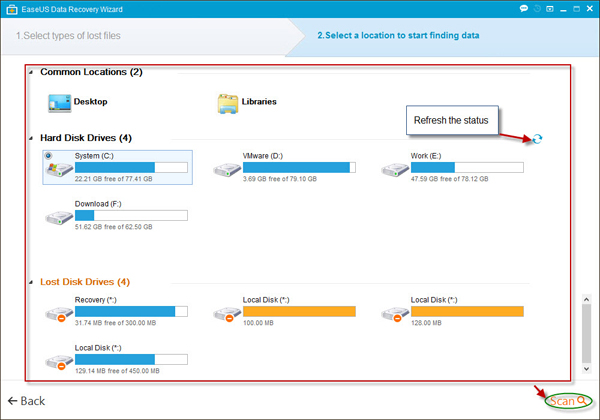
Step two is to select the location/partition where the lost data were. Quite reasonable.
After all these, I clicked “scan”. Half an hour later, it told me that the job has been done. I previewed the recovered files, and find out the most important ones.
There I got most of the deleted files back just following the guide of EaseUS Data Recovery Wizard Free. I thought that this kind of good software really worth my recommendations. It can save our lives.
So my story has told you that never leave your computer to a kid and never forget to make a backup. But when you deleted files by accident, you can turn to EaseUS Data Recovery Wizard Free any time.